Tuesday, July 19, 2011

My Tomato Plants Are Wilting... And Then They Die!

Tomato Wilting Symptoms (Photo by F.J Louws)
Every summer the Plant Disease and Insect Clinic receives samples from clients who tell us that their tomato plants “wilt and then die.”  This can be very discouraging for a home gardener, and devastating for a commercial grower who has a field of plants going down.  If you observe these symptoms, be prepared for some bad news!

In the piedmont and coastal plain regions of our state the most common cause of wilting and death in tomatoes is bacterial wilt.  The destructive pathogen Ralstonia solanacearum is able to wipe out home gardens and whole fields of tomatoes.  It also attacks many members of the nightshade family: tomatoes, peppers, potatoes, and eggplant, along with zinnias, geraniums, sunflowers, and marigolds.  Ralstonia causes Granville wilt in tobacco (also a relative of tomatoes), the subject of some of the earliest work on plant diseases at NC State. A bulletin published in 1903 warned growers that curing Granville wilt was “hopeless.”


The most obvious symptom of bacterial wilt is wilting, followed by sudden collapse of the entire plant.  Basically, bacteria plug up the water conducting tissue in the stem. The plant is unable to transport water from the soil to the leaves and the plant wilts and dies.  

Tomato Collapse (Photo by F.J. Louws)
Burley Tobacco Wilting (Photo by H.D. Shew)
Ralstonia can survive in most soils for years without a host present. When susceptible plants are planted in infested soil, it is only a matter of time before the plant becomes infected.   A heavy rain or watering can help bacteria move through soil to the roots of susceptible plants. A few large black roots are often found where the infection got started. This is especially evident in infected tobacco plants.   
Black Roots Where Infection Took Place
(Photo by H.D. Shew)
If you suspect bacterial wilt, there are quick and easy diagnostic checks you can do yourself.  The first thing you need to do is check for vascular browning inside the stem.  Tomato stem tissue should be very light green.  The easiest way to check for vascular discoloration is to cut the stem, as shown in the image below. 


Tomato Stem: Note Brown Discoloration
(Photo by M.J. Munster)
Vascular Browning (Photo by E.C. Lookabaugh)
Next, check for bacterial ooze. The easiest method is to cut the stem off at the base.  Take the stem cutting and hang it over a glass of water (shown below).  After a few minutes, you should be able to observe a cloudy stream of bacteria oozing from the cut tissue.  It is very important not to disturb the glass of water during the test.  

Bacterial Stream Test (Photo by M.J. Munster)
Note White Bacterial Streaming (Photo by M.J. Munster)

Sometimes, it can be hard to see the bacteria. If you have access to a microscope, take a thin slice of brown vascular tissue and place it in a drop of water on a glass microscope slide.  Make 2 straight cuts across the tissue (cutting the tissue into 3 pieces).  Put a cover slip on top and look through the microscope using the 10x objective.  Within seconds, you should be able to see dark brown plumes of bacteria oozing from the slices.  

Slice Vascular Tissue on Glass Slide
(Photo by E.C. Lookabaugh)

Micrograph of Bacterial Ooze
(Photo by E.C. Lookabaugh)
If you don’t see any bacteria, you probably don’t have bacterial wilt. Fusarium wilt can cause vascular browning and is common in the Piedmont. Most modern varieties of tomatoes are resistant to Fusarium wilt, but we see it often in heirloom varieties. Southern blight or high soil salts are other potential causes of browning. Another wilt disease, Verticillium wilt, is present in many mountain areas, and has other distinctive symptoms.

Arrow Pointing to Bacterial Ooze on Tobacco Stem
(Photo H.D. Shew)
Arrow Pointing to Bacterial Ooze on Tomato Stem
(Photo by E.C. Lookabaugh)
Much as in 1903, if your plants have bacterial wilt, there is nothing you can do to save them. Infected plants will not recover and should be removed and destroyed. Replanting with new plants will not solve the problem because they will likely become infected and die too. The bacteria can persist in the soil for years, so it is best not to plant susceptible plants back into that area. Rotation with non-host plants, for example, sweet corn, for at least three years is recommended. 

Growing tomatoes in containers with potting soil is one option if your garden is infested. Be sure that the containers are not in contact with the native soil and be careful not to spread infested soil to new locations. 

For commercial growers, some soil treatments and the use of resistant rootstocks and grafting can be an option for the following year.  More information on root grafting can be found here:

For a look at the history of the Department of Plant Pathology and Granville wilt in North Carolina agriculture, see http://www.cals.ncsu.edu/plantpath/FromLabtoField.pdf

Special thanks to Dr. David Shew for helping with this posting!

Friday, July 8, 2011

My Blueberries Look Funny...

Written by Bill Cline

In July, blueberries are ripening all across the state.  These excellent little berries can be grown in your back yard, but you may not know that they are also our most valuable commercial fresh fruit crop.  Growers in southeastern NC harvest hundreds of acres beginning in May each year, and each year the clinic receives diagnostic samples of berries affected by diseases, insects and weather.  Here are a few of the problems we have diagnosed recently:

Mummy Berry
Mummy berry is caused the fungus Monilinia vaccinii-corymbosi.  This fungus overwinters on the ground underneath blueberry bushes, and in spring produces a cup-shaped mushroom that releases spores.  These spores infect and kill emerging leaf shoots, causing the primary, or shoot blight phase, of the disease.  These blighted shoots then produce a second type of spore that is carried by insects to the flowers, where the secondary, or fruit infection stage takes place.  The end result is “mummies” – berries that do not turn blue, but instead turn pink or salmon-colored and fall to the ground.  Mummy berry can be controlled with fungicides, through the use of resistant cultivars, by removal of infected fruit, and by mulching to bury any mummies remaining on the ground.
Mummy Berries: Infected berries are pink (Photo by Bill Cline) 
Fruit rots
Fruit rotting fungi cause soft, leaky or “fuzzy” berries (visible spores or mold). Blueberries are more resistant to decay than other small fruits, but still need to be harvested in a timely fashion to avoid fruit rots.  Berries do not ripen all at once, but are picked over several weeks.  Highbush blueberries should be harvested every four or five days, while rabbiteye blueberries are harvested every seven to ten days (rabbiteye blueberries are the most common backyard species in North Carolina).  It is important to “clean” the bush at each harvest date by removing all blue fruit, to avoid having overripe, leaky berries in later pickings.  If the bushes are wet with dew or rain, wait until they dry before harvesting, since handling wet berries greatly increases post-harvest decay.  
Blueberry Fruit Rot (Photo by Bill Cline)
Exobasidium
Exobasidium vaccinii is a fungus that causes a “green spot” symptom on blueberry fruit and can also infect leaves.  This disease is becoming increasingly common in commercial fields and has also been diagnosed on blueberries in other states.  Little is known about this fungus on blueberry, and no control measures have been established.  The disease occurs sporadically and seems to be associated with high humidity -- low or sheltered parts of fields where air movement is limited.
Berries infected with Exobasidim (Photo by Bill Cline)
Insects in berries
Blueberries are sometimes infested with larval stages of insects, including blueberry maggot fly, cranberry fruit worm, cherry fruit worm, Plum curculio and a new pest, spotted-wing drosophila.  All these pests are controllable, but must be properly diagnosed since control measures vary.  Cherry fruitworm and cranberry fruitworm are frequently encountered in unsprayed fields. The cranberry fruit worm produces “frass” that looks like a small clump of sawdust on the outside of a cluster of berries, while cherry fruitworm usually affects only two berries, “gluing” the two together and producing frass only inside the fruit.
Cranberry fruitworm frass (looks like sawdust) (Photo by Bill Cline)
Hail damage
There has been quite a lot of hail this year resulting in damage to blueberry fruit.  Affected berries are usually damaged in spring while the fruit is still green.  Initially only bruised or dented, hail-damaged berries develop scars and cracks as they swell and ripen, and these symptoms can be confused with disease or insect damage.  Where hail damage is suspected, look for tattered leaves as further evidence of a hail event.
Hail damage on blueberries (Photo by Bill Cline)

Wednesday, June 29, 2011

Japanese Beetles Out in Full Force This Season

Robber fly eating Japanese beetle (Photo D. Stephan) 
Barbara Shew, our clinic director, said that she observed the cardinals in her yard putting on quite a show a few days ago.  They were knocking Japanese beetles from her crape myrtle flowers and then chasing the beetles as they tried to fly away.  I guess sometimes cardinals delight in chomping down some beetles in addition to their usual diet of seeds.  Cardinals are not the only animals that enjoy the occasional beetle treat.  My cat, Slinky, loves eating Japanese beetles.  She catches them, knocks them out with her paws, and then carries them to the hood of the car.  After letting them cook all day in the sun, she goes back and eats them! Predatory insects, like robber flies, assassin bugs, and others will feed on the adults.  Unfortunately, humans do not get the same satisfaction from finding these beetles in their yards. 

Japanese beetles emerge once per year to feast on a variety of ornamental and crop plants.  Their favorite ornamental hosts include roses, rosaceous trees, shrubs such as crab apple, crape myrtle and linden, grape, and fruit trees. 

Typically, Japanese beetles feed on the upper leaf surface eating the tissue between leaf veins.  This gives the leaves a lacy appearance, a type of damage called skeletonizing.  

Japanese beetle and skeletonizing damage (Photo: B. Shew)

They generally consume entire petals of roses and other flowers. Beetles aggregate on plants in response to chemicals (odors) released by damaged plants and pheromones released by female beetles.  The resulting hungry masses of beetles can rapidly devour trees, shrubs, vines, and flowers.

Japanese beetle damage (Photo: B. Shew)

 After they have fed for a while, the female beetles burrow into soil to lay their eggs.  Grubs (larvae) hatch from the eggs and feed underground through the rest of the summer and fall. Female beetles and the grubs prefer moist soils, so a damp summer means more beetles the following year.

The beetle grubs may be serious pests of the roots of grasses and shrubs, especially on turf farms and golf courses.  They burrow through the soil feeding on roots.  This can result in areas of dead grass.  The grubs overwinter deeper in the soil, and in the spring, they move just below ground level, complete feeding, and pupate.  New beetles emerge from pupae in late spring to start the cycle again.

Japanese beetles can fly long distances, so beetle traps do not offer any protection to landscape plants.  They may actually attract more beetles to your yard! Likewise, treating a lawn for Japanese beetle grubs will not reduce damage from incoming beetles.

Long-term protection for landscape and nursery plants can be achieved through the use of neonicotinoid insecticides such as imidacloprid (e.g., Merit, Marathon II) or acetamiprid (Tri-Star).  Acelepryn (chlorantraniliprole) is a new product with extremely low vertebrate toxicity but good efficacy against a number of pests, including Japanese beetles.

Japanese beetle on flower (Photo: B. Shew)

For more information on the biology and management of adult Japanese beetles in nurseries and landscapes, consult Ornamentals and Turf Insect Information note No. 146 at:
http://www.ces.ncsu.edu/depts/ent/notes/O&T/flowers/note147/note147.html
http://www.ces.ncsu.edu/depts/ent/notes/O&T/flowers/note44/note44.html


Special thanks to Steve Bambara and Dave Stephan for their help with this post!

Tuesday, June 14, 2011

It Looks Like a Dog Threw Up in My Mulch: Slime Molds - Harmless but Ugly!

Fuligo Septica in Mulch
Photo by Donna Steinbach (Submitted to PDIC)

Every year, we receive image samples depicting the “dog-vomit” slime mold. 

People see this ugly growth on their mulch and immediately want to get rid of it! The culprit is a slime mold known as Fuligo septica.  In spite of their names, the slime molds are not true fungi, but are related to amoebas, algae, and paramecia. These fascinating organisms spend part of their lives inconspicuously creeping through mulch, leaf litter, etc., engulfing bacteria and bits of organic matter.  Through some sort of environmental or chemical signal, they switch to the spore-producing phase of their life cycle.  In the case of Fuligo septica, the spore-producing fruiting body appears as a bright yellow froth that quickly forms a pinkish crust covering the dark powdery spores inside.  These spores will blow away and start the cycle over again.  The fruiting body can simply be raked out of the mulch or washed off with a hose. It is not toxic, although some people are allergic to the spores.  
Fuligo Septica Slime Mold
Photo by Donna Steinbach (Submitted to PDIC)

The dog vomit slime mold is not a plant pathogen. However, slime molds sometimes will grow on plant parts that touch the affected mulch, as seen on the end of a gardenia branch in the picture below.
Slime Mold on Gardenia
Photo by Mike Munster

Fuligo septica is often seen in hardwood mulches. It is less of a problem in pine bark or cedar mulches.  It is usually worse the first year mulch is applied than in subsequent years.  

While dog vomit is one of the most noticeable slime molds, many other types can be found in most back yards. 

Here are some other slime molds we have seen lately.  

Physarum Slime Mold
 On Annual Ryegrass and a weed (Carolina geranium)
Photo by Mike Munster

Physarum Slime Mold
On Cucumber
Photo by Anne Edwards

Slime molds can be startling, but up close they can be startlingly beautiful.  See the collection of images by Georgia resident Ray Simons here.

Special thanks to Mike Munster for helping with this blog idea!

Friday, June 10, 2011

Attack of the Killer Tomato (Spotted Wilt Virus)


TSWV fruit symptoms
Photo by F. J. Louws
Lately, we have seen a lot of tomato samples with tomato spotted wilt  (TSWV) come through the clinic.  TSWV is a virus that is spread by at least seven different kinds of tiny insects known as thrips.  It takes only 15 minutes of feeding for a tomato plant to become infected, and once TSWV is acquired, there is no cure.  TSWV is sporadic in nature with heavy disease pressure in some years relatively little disease pressure in others.  Due to this unpredictable nature, and the broad host ranges of thrips, controlling TSWV can severely challenge traditional pest management practices. 
TSWV can be a major problem both in greenhouses and in the field and can affect field crops like tomato, peanut, and pepper, tobacco along with many ornamental plants.  On tomatoes, symptoms may be expressed on leaves, petioles, stems, and fruit.  Early symptoms include cupping and off-colored bronzed foliage.  Later, leaves may show small, dark spots and eventually die.  Dark brown streaks can be seen on stems and petioles.  Plants may be severely stunted and new growth can be deformed.  Sometimes the plant may exhibit one-sided growth.  The tops of the plants may turn yellow and wilt.

TSWV foliar symptoms
Photo by E. C. Lookabaugh

Fruit symptoms are very distinctive.  Immature fruit have mottled, light green rings with raised centers.  Mature fruit has a unique red/orange mottling that can make the fruit unmarketable.

TSWV immature fruit symptoms
Photo by F. J. Louws 

TSWV mature fruit mottling
Photo by E. C. Lookabaugh


In North Carolina, tobacco thrips (Frankliniella fusca) and western flower thrips (F. occidentalis) are the two most common vectors.   Tobacco thrips are able to spread the virus from nearby weed hosts before they can be killed by insecticides applied to the crop.  Early infections usually result in the greatest impact on yield because early infections can prevent flowering and fruit set.   Secondary spread within fields is very uncommon but may occur by large populations of western flower thrips.  Western flower thrips are extremely difficult to control because they are highly tolerant to insecticides and prefer to reside deep within the blossoms where it is difficult to reach with insecticides.  In addition to spreading TSWV, thrips alone can be damaging to crops because of how they feed.  Thrips feeding causes the collapse of plant cells which leads to deformed plant growth, flower deformation, and silvery areas and flecking on expanded leaves. 

Two common TSWV vectors
Photo UGA

Controlling this disease is very difficult.  In home garden settings, there is usually little secondary spread after the first wave of infections in the spring when virus-bearing thrips are moving from winter weeds to garden plants.  You may wish to remove infected plants, especially those that were infected before fruit set, because they will not recover.

TSWV field symptoms (left plant showing severe stunting)
Photo by F.J. Louws
In a field setting, it is important to manage weeds adjacent to the field because these weeds harbor both the thrips vector and the virus during the winter.  Infected plants should be removed and destroyed as soon as symptoms appear.  TSWV resistant varieties are available and can be effective.  Organic growers and other larger acreage growers may want to consider reflective mulches to cover their beds rather tha the traditional black mulch.  In greenhouses, thrips populations should be eliminated so they, along with TSWV, are not spread to the field when seedlings are transplanted.  

More information on managing this disease can be found here, under "Viral Diseases"

Special thanks to Dr. Louws for helping put together this post and for supplying images!

Friday, June 3, 2011

Now That's Just Peachy!

My favorite time to visit the local farmers market is during peach season.  To me, there is nothing tastier than slicing open a juicy peach on a hot summer day.  Right now, there are three major peach diseases that you can be on the lookout for: bacterial spot, peach scab, and brown rot.  The next time you visit the local market or if you have a peach tree in your backyard, try and see if you can spot some of these diseases for yourself! 

Bacterial Spot
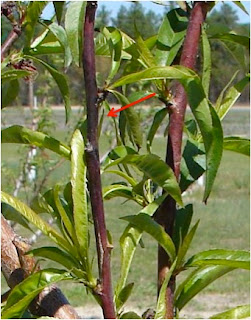
Dr. David Ritchie, the peach “disease” guy here at NCSU, says that, this year, bacterial spot is the worst he has seen since 2003 and the most damaging it has been in the past 20 years on highly susceptible cultivars.  Bacterial spot is caused by the bacterium Xanthomonas arboricola pv. pruni.   The most obvious leaf symptoms are yellow, chlorosis of the leaves with angular lesions at the leaf tip, mid-rib, and along the leaf margin.  Premature leaf drop is common in infected leaves.  Foliar lesions appear water-soaked and sometimes grayish in color.  As lesions age, centers may become dark or purple in color and necrotic, eventually dropping out to result in a shot-hole appearance. 

Bacterial Spot Symptoms
(Photo by D.F. Ritchie)
Twig symptoms consist of cankers on either side of leaf and flower buds on the previous year’s growth.  These cankers are called “spring cankers” because they are first visible during bloom.  “Summer cankers” can be seen on current-season growth and are visible early to mid-summer.  

Bacterial Spot Twig Symptoms
(Photo by D.F. Ritchie)
Bacterial Spot Twig Symptoms
(Photo by D.F. Ritchie)
The earliest fruit lesions are normally seen about three weeks after petal all.  Fruit infection is favored by moist and warm conditions with fruit being very susceptible from shuck split to pit-hardening. Developing lesions have a water-soaked appearance with small necrotic centers that become black in color and enlarge as the lesions mature.  Early infections result in lesions that expand down the pit before harvest.  Infections later on in the season result in shallow lesions that cause skin cracking.  Attempts to control bacterial spot at this time in the season (June) are of little to no value because once the bacteria have infected, the “path” to damage has occurred. 

Bacterial Spot Fruit Symptoms
(Photo by D.F. Ritchie)
Bacterial Spot Fruit Symptoms
(Photo by D.F. Ritchie)

Peach Scab

Peach scab occurs every year in North Carolina.  This disease is caused by the fungus, Cladosporium (syn. Fusicladosporium) carpophilumC. carpophilum is an asexual fungus that produces conidia and chlamydospores.  The conidia are wind or water splashed dispersed and infect shoots, leaves, and fruit during the season.  Chlamydospores are thick-walled survival structures that form on infected twigs during the winter.  Usually the leaf infections are less noticeable and least important.  The twig infections are ecologically important because they serve as the site for the production of the overwintering chlamydospores.  Fruit infections result in considerable yield losses because of grade reductions or culling of affected fruit that would be less desirable in the marketplace.  First fruit infection occurs during the 4-week period after bloom. The fungus has a long latent period of approximately 6 weeks before the scab lesions are observed, usually by the end of May to early June.  Greenish-gray to olive circular spots form on the fruit and these spots expand in size as the disease progresses. 

Peach Scab
(Photo by D.F. Ritchie)
The fungus sporulates on the fruit lesions, producing conidia that can cause secondary infections of fruit and twigs.  Fruit scab lesions often have a raised, corky appearance, whereas bacterial spot lesions are often sunken in appearance.  Severe infections may lead to cracking of the fruit skin, which can serve as entry points for fruit-rotting organisms like the brown rot fungus.  There are no resistant varieties or cultural control options for managing peach scab.  Control relies exclusively on well-timed fungicide applications starting at petal fall and making 2-3 applications during the following 4-5 weeks. Once scab is observed, fungicide sprays will have little if any controlling effect of scab on the fruit.


Brown Rot
Brown rot is most risky in warm, humid climates.  Brown rot is caused by the fungus, Monilinia fructicola.  This disease occurs in two phases: a twig and blossom blight phase and a fruit rot phase.  Twig and blossom blight phase occurs in early spring when the trees are blooming.  Infected blossoms wilt, turn brown, and usually cling to the twigs.  The infections can then spread into the twigs resulting in twig cankers. Fruit susceptibility to brown rot increases during the 2 to 3 week period prior to harvest because of the increased sugar content in the fruits.  Initially, tan-brown circular spots can be seen on the fruit. 


Brown Rot
(Photo by D.F. Ritchie)
Under humid conditions, ash-gray-brown spore masses are visible on infected tissue.  There can be thousands of spores on each lesion and each spore is capable of initiating a new infection.  If conditions are wet and warm during fruit ripening, the entire crop can be destroyed overnight! Controlling this disease relies primarily on good sanitation practices combined with judicious use of fungicides.  Fungicides are most effective when applied just before the blossoms open and then again during the 2-3 week period leading up to harvest. 


More information on peach production and diseases can be found in the "Peach Growers Handbook"

Hopefully these diseases won't keep too many peaches from ending up in your basket at the local martket! Enjoy!

Special thanks to Dr. David Ritchie for providing his peach disease expertise and photos!


Thursday, May 19, 2011

First Slime Flux Sample of the Year Arrives in Clinic

Slime flux on white oak
(Photo by: Randy Cyr, Bugwood)
The first slime flux sample of the season was sent to the clinic today, as a digital image from a Raleigh homeowner.  This is a problem we usually associate with the warmest months of the year. Slime flux is a foul-smelling and unsightly seepage of sap from the trunk of shade trees.  Slime flux occurs in apple, birch, elm, hemlock, maple, mulberry, oak, poplar, and willow.  In North Carolina, slime flux is quite common in the landscape on large, mature oaks, tulip poplars, and elms. In oaks, the fluxing usually occurs on the lower portion of the trunk, close to the ground.

The underlying cause of slime flux is a condition called wet wood, which develops when bacteria ferment the sap within the wood. These bacteria enter through wounds, usually in the roots. The affected wood turns dark and appears water soaked.  As the sap is fermented, methane and carbon dioxide gases can be produced. If the internal pressure from the gas becomes great enough, the fermented sap seeps out of cracks or wounds and down the bark. The flux is colorless to tan at first, but darkens upon exposure to the air.  As fluxing continues, large areas of the bark can become soaked. 

Many different microorganisms grow in the flux, which results in a foul or alcoholic smell.  Various types of insects, including bees, wasps and butterflies, are commonly attracted to it.

Some dieback may occur in severely affected trees, but often the fluxing stops after several weeks or months with no apparent damage to the tree. The slime flux may be triggered by heat, drought, or other stresses, so try to maintain good growing conditions.  There is no curative treatment for slime flux, but it will do no harm to remove loose bark over the area. Wet wood and slime flux are one more reason to avoid causing wounds to tree roots.


For more info: Click Here

Tuesday, May 17, 2011

My plants have a little sugar coating :) Powdery Mildew Spotted in the Landscape

Powdery Mildew on Crape Myrtle
(Photo: H.D. Shew)
Powdery mildew has started to show up on many landscape plants. Powdery mildew is easily diagnosed on most plants by the characteristic coating on leaves that gives this disease its name. The “powder” will not rub off – it is actually the mycelium and spores of the disease-causing fungus. 

Powdery mildews frequently infect dogwoods, crape myrtles, roses, lilacs, tulip-trees, oaks, and numerous other shrubs and perennial plants.  In addition to the powdered appearance, typical symptoms include discolored and distorted leaves, shoots, and flowers. Although powdery mildews rarely cause serious damage to most hosts, severe cases can result in defoliation or poor growth. 

PM on fruit
(Photo: H.D. Shew)
PM on flower stem
(Photo: H.D. Shew)
While most powdery mildews look the same to the naked eye, hundreds of different species of fungi cause powdery mildews. Most are specific to a particular host. Under the microscope, different groups of powdery mildews can be identified by their highly distinctive cleistothecia (specialized spore-bearing structures).
PM micrograph
Note hooked appendages
(Photo: H.D. Shew)
PM micrograph
Note branched appendages
(Photo: H.D. Shew)

In the spring, cleistothecia from previous infections rupture and release wind-blown spores.  These spores land on susceptible plant tissue and begin to grow on the surface and into the upper layer on the leaf.   The fungus produces columns of asexual spores that are capable of causing new cycles of infection.  Late in the season, the cleistothecia appear as tiny dark specks embedded in the mildew.  These contain the sexual spores of the fungus and will overwinter to start new infections in the spring.
Black cleistothecia embedded in mycelial mat
on leaf surface (Photo: H.D. Shew)
Powdery mildew is most common in cool or warm and humid weather conditions, but it may occur and cause severe damage in warm and dry climates. Temperatures between 70-80 degrees F and a relative humidity between 85%-100% favor infection. Powdery mildew pathogens are some of the only fungal organisms that can germinate and infect in the absence of free water.  These fungi require high humidity but are not dependent on wet leaves for infection and spread.  Excess leaf wetness actually inhibits spore germination. 

Management:
Cultural Control:
  • Purchase mildew resistant varieties
  • Reduce humidity: Increase air circulation and light penetration by thinning and pruning plants to reduce overcrowding
  • Avoid planting susceptible plants in shaded areas
  • Sanitation: Prune out dead and diseased tissue and rake and remove any fallen tissue to reduce the chances of the fungus surviving until the following season
  • Overhead watering of the leaves: Water inhibits spore germination for most powdery mildews, but be careful because excess leaf wetness can increase chances of other foliar diseases.  
  • Avoid practices that stimulate succulent growth: Powdery mildews are obligate parasites that prefer fresh, succulent plant growth. Applying nitrogen fertilizer, pruning heavily, and watering excessively are not recommended because they promote succulent growth.  
Powdery mildew on dogwood (Photo: H.D. Shew)
Chemical Control: 
Chemical control is often not necessary in the landscape because this disease rarely kills the plant.  Spraying trees such as dogwoods and crape myrtles can be impractical. 

Fungicides may be used to control powdery mildew on highly susceptible varieties of roses and other plants that suffer severe symptoms and damage.

See Rose Diseases and Their Control in the Home Garden
Rose Diseases Link